Ever looked at a drawing and thought, “How did they do that?” I used to wonder the same thing. For the longest time, I believed great artists were just born talented.
But then I learned something that completely changed how I see drawing. Every artist, beginner or pro, uses the same set of building blocks. They’re called the 7 elements of art drawing.
Once you understand them, it all starts to click. You’ll see how artists bring lines, shapes, color, and texture together to make a drawing feel balanced and complete.
Here, I’m breaking down each element in simple terms so you can start using them in your own drawings.
What Does Elements of Art Mean?
Think of the elements of art as the basic building blocks of any artwork. They are the visual elements that every artist uses, whether painting, sketching, or drawing.
Elements of art include line, shape, color, and texture. Now, elements of art and principles of design are not the same thing. Elements are the parts you work with.
Principles are how you arrange those parts. Think of it this way. Elements are your ingredients. Principles are your recipe. You need both to create something that looks good and feels complete.
The 7 Elements Of Art Explained
Every great drawing is built on the same foundation. Whether you are a total beginner or have been drawing for years, these seven elements are what make artwork come together.
Let’s break each one down simply and clearly so you can start using them right away.
Line In Drawing
Line is the most basic element in drawing. It is the first thing most of us learn when we pick up a pencil.
Lines do a lot more than just outline shapes. They create edges, show direction, and pull the viewer’s eye around the drawing.
They can make something feel calm, chaotic, strong, or delicate. The way you draw a line changes the whole mood of your artwork.
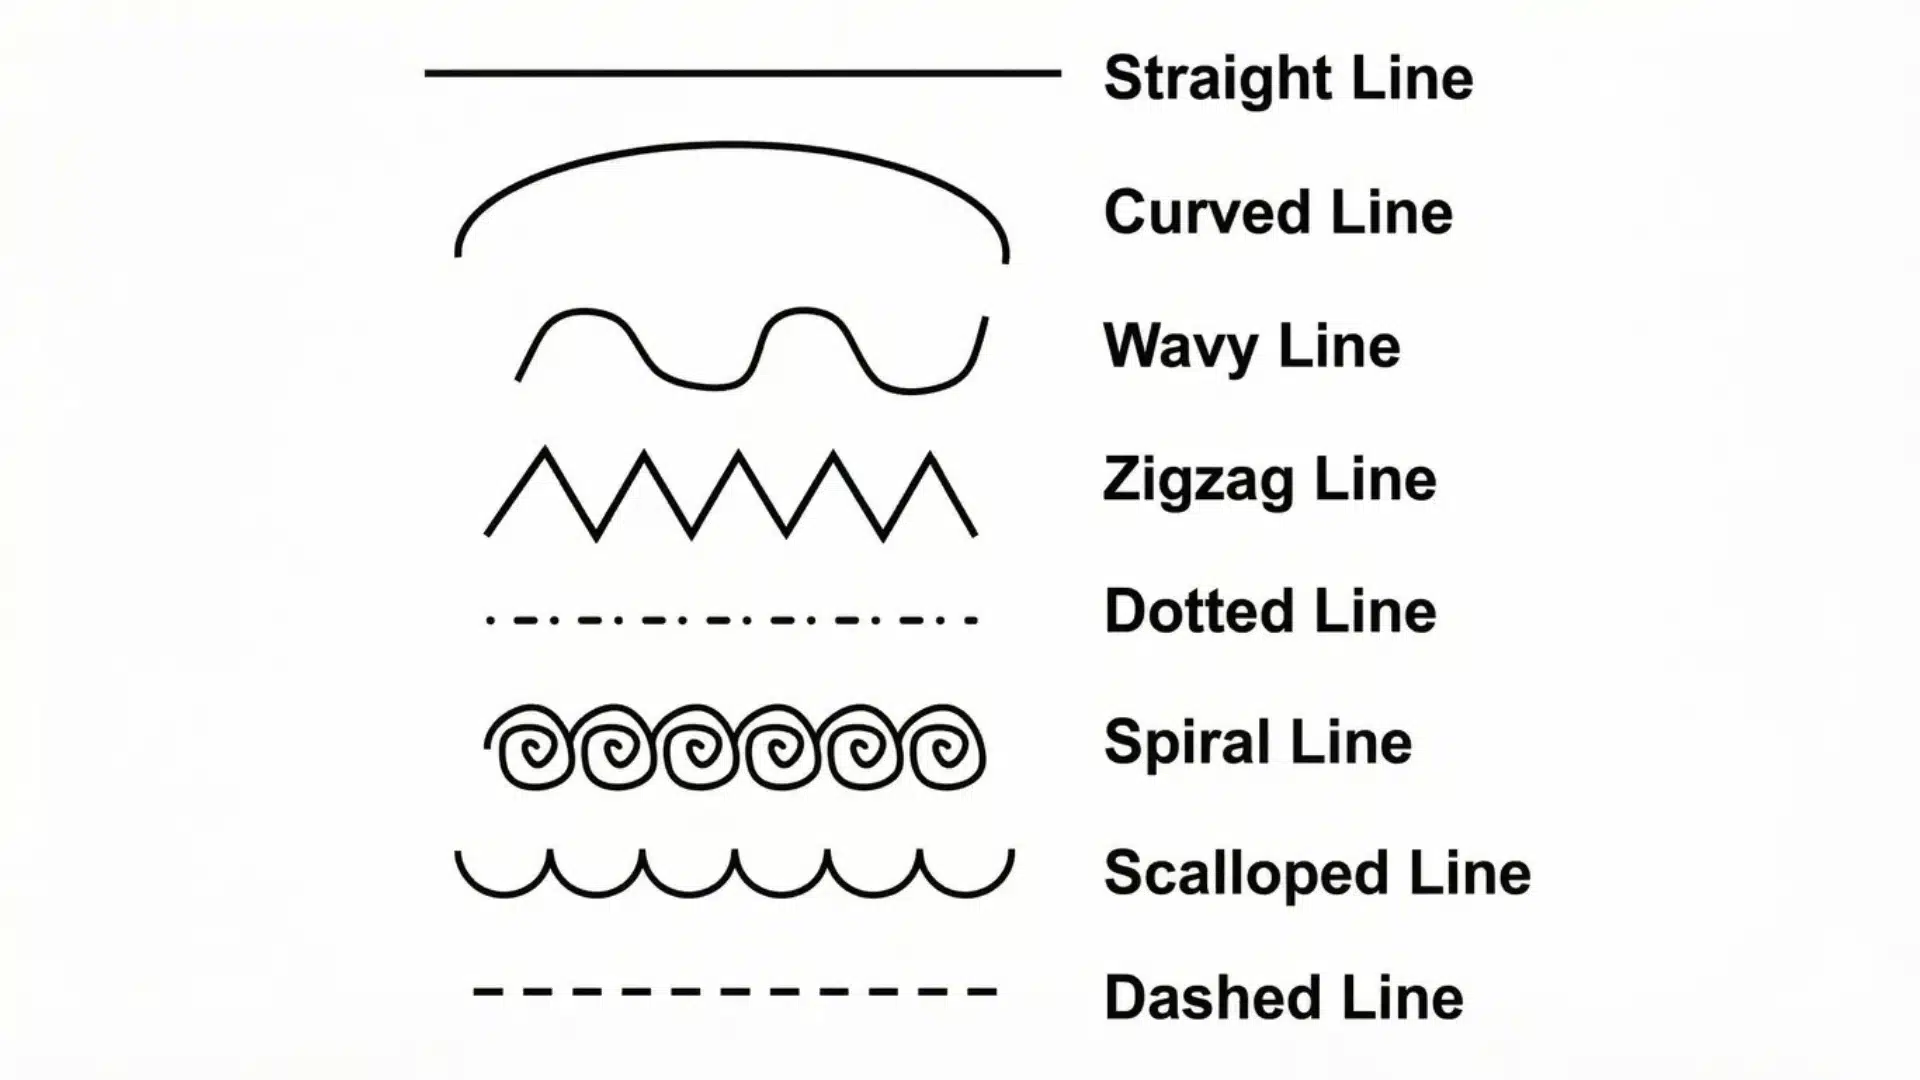
Lines come in many forms, and each one creates a different mood. Here is a look at the most common types and what they bring to a drawing:
1. Straight Lines
Straight lines move directly from point to point without any bends. They feel clean and precise, making them perfect for drawing structures and geometric shapes.
2. Imaginary Lines
Imaginary lines are not drawn but felt. The brain connects nearby shapes or objects into a line, helping guide the viewer’s eye naturally through a drawing.
3. Three-Dimensional Lines
Three-dimensional lines create the illusion of depth on a flat surface. Think of a road narrowing in the distance. They make drawings feel real and spacious.
4. Horizontal Lines
Horizontal lines run left to right. They feel calm and stable. Think of a flat horizon or a person lying down. Artists use them to create a sense of rest and balance in a drawing.
5. Vertical Lines
Vertical lines stand straight up and down. They feel strong and tall. Think of trees, buildings, or standing figures. They give drawings a sense of height and structure.
6. Diagonal Lines
Diagonal lines move at an angle. They feel active and energetic. Artists use them to show action, tension, or movement. A falling object or a running figure often uses diagonal lines.
7. Curved Lines
Curved lines are smooth and flowing. They feel soft and natural. You will find them in waves, hills, and human bodies. They bring a gentle, organic feel to any drawing.
8. Zigzag Lines
Zigzag lines move back and forth at sharp angles. They feel sharp, fast, and intense. Artists use them to show lightning, rough textures, or high energy. They grab attention quickly.
9. Spiral Lines
Spiral lines curve and wind inward or outward. They feel dynamic and hypnotic. Artists use them to show shells, curls, or energy patterns. They can add visual interest and a sense of rhythm.
10. Thick vs Thin Lines
Thick lines feel bold and close. Thin lines feel light and far away. Mixing both in a single drawing adds depth and visual variety with little effort.
11. Continuous vs Broken Lines
Continuous lines feel solid and defined. Broken or dashed lines feel lighter or suggest something partially hidden. Broken lines are great for showing texture or implied edges.
12. Implied Lines
Implied lines are not actually drawn. They are suggested by where shapes point or where the eyes in a portrait look. They guide the viewer without being visible.
Shape In Drawing
Shape is everywhere in drawing. The moment you close a line, you have created a shape. Understanding shape helps you simplify complex subjects and build drawings with confidence.
Every object around you can be broken down into basic shapes.
A shape is a flat, two-dimensional area created by an outline or a change in value. Shapes have no depth on their own. They are the starting point before you add form, shading, or detail.
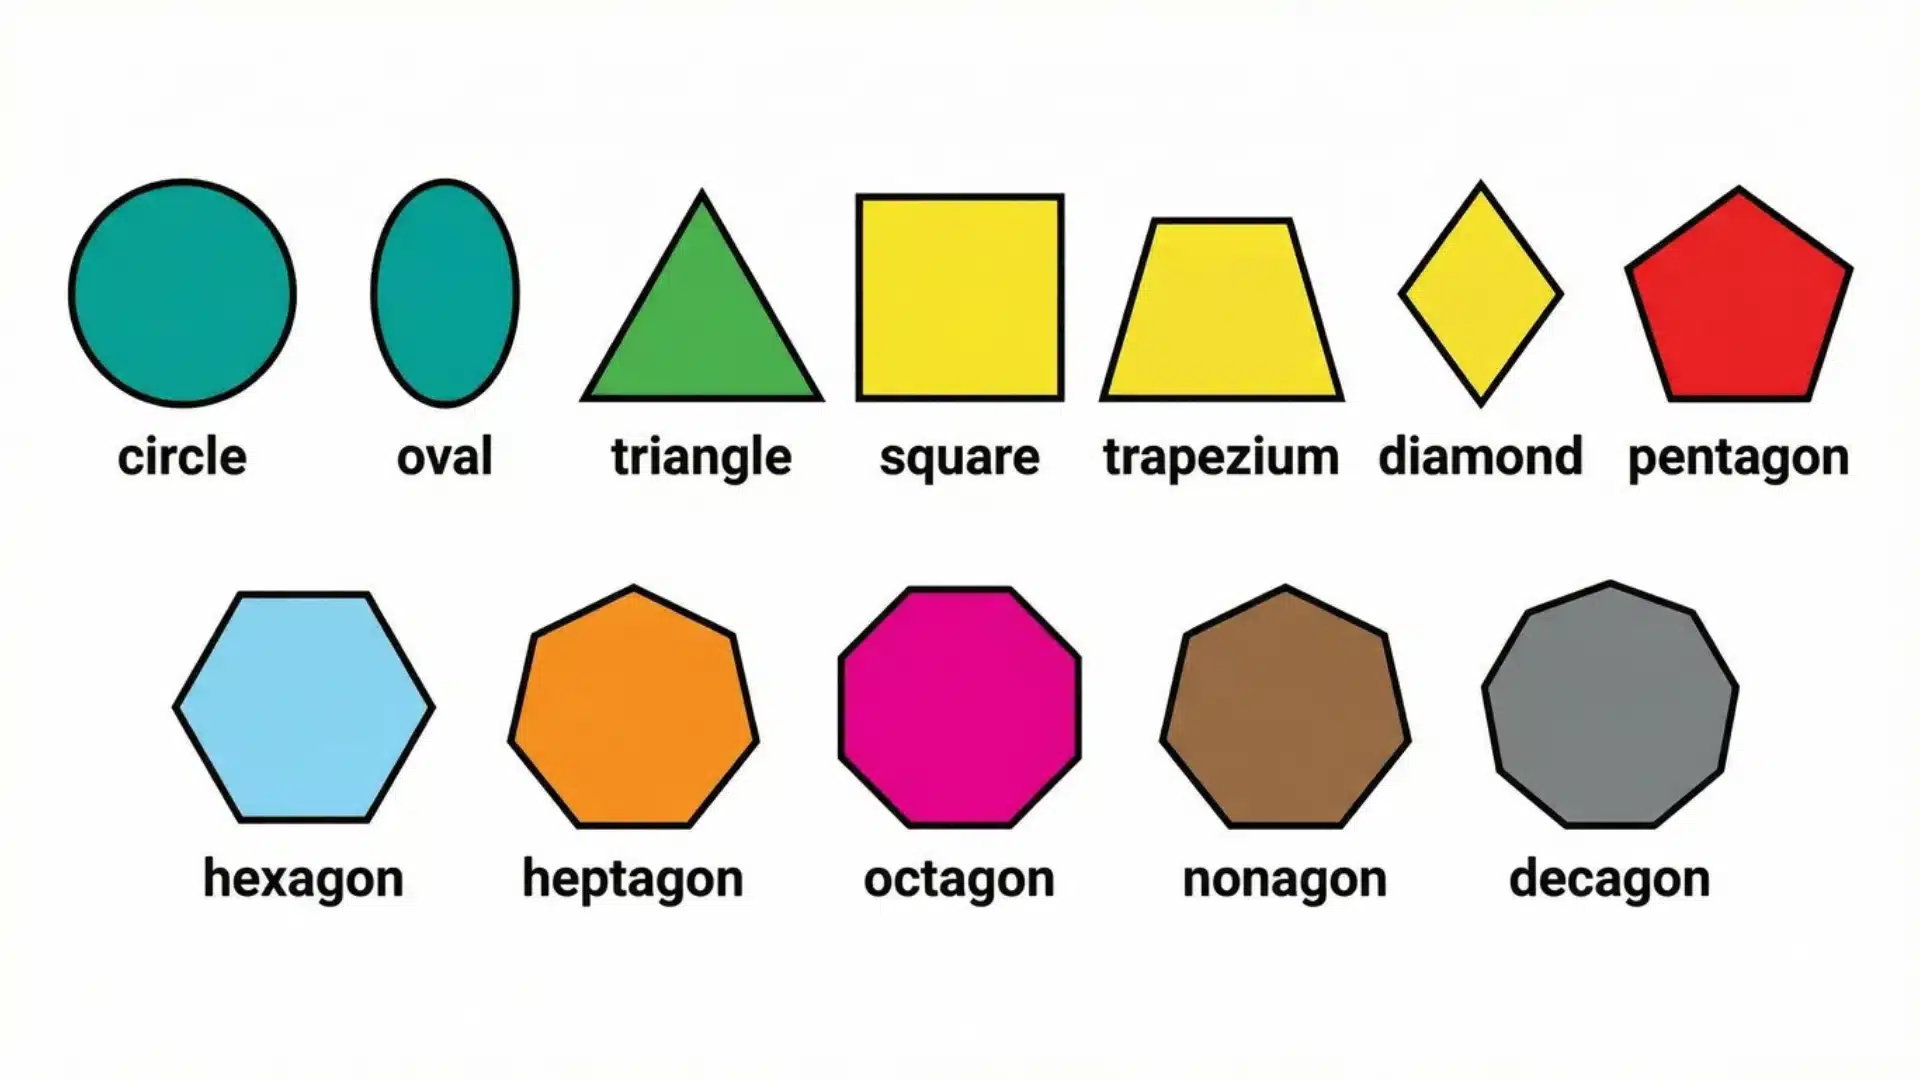
Geometric Shapes Vs Organic Shapes
Not all shapes look the same. Some have clean, sharp edges, while others are soft and irregular. Knowing the difference helps you choose the right shapes for whatever you are drawing.
| Feature | Geometric Shapes | Organic Shapes |
|---|---|---|
| Edges | Sharp, clean, and precise | Soft, irregular, and flowing |
| Examples | Circle, square, triangle, rectangle | Leaves, clouds, human body parts |
| Feel | Structured and man-made | Natural and freeform |
| Used for | Buildings, objects, patterns | Nature, figures, abstract art |
Neither type is better than the other. It all depends on what you are drawing. Use geometric shapes for man-made objects and organic shapes for anything found in nature.
Positive And Negative Shapes
Every drawing has two kinds of shapes, whether you plan them or not. The object you draw is the positive shape.
Everything around it, the empty space inside your drawing area or page, is the negative shape. Both matter.
Learning to see and use negative shapes helps you draw more accurately and create better compositions. Many artists sketch the negative space first because it is often easier to see than the object itself.
Form In Drawing
Form takes shape one step further. It adds the feeling of depth and volume. A circle becomes a sphere. A square becomes a cube.
Form is what makes a drawing feel three-dimensional, even on a flat page. Mastering form is key to making drawings look real.
Form is the three-dimensional look of an object in a drawing. It gives the feeling of volume and mass. You create form through shading, light, and shadow rather than just outlines.
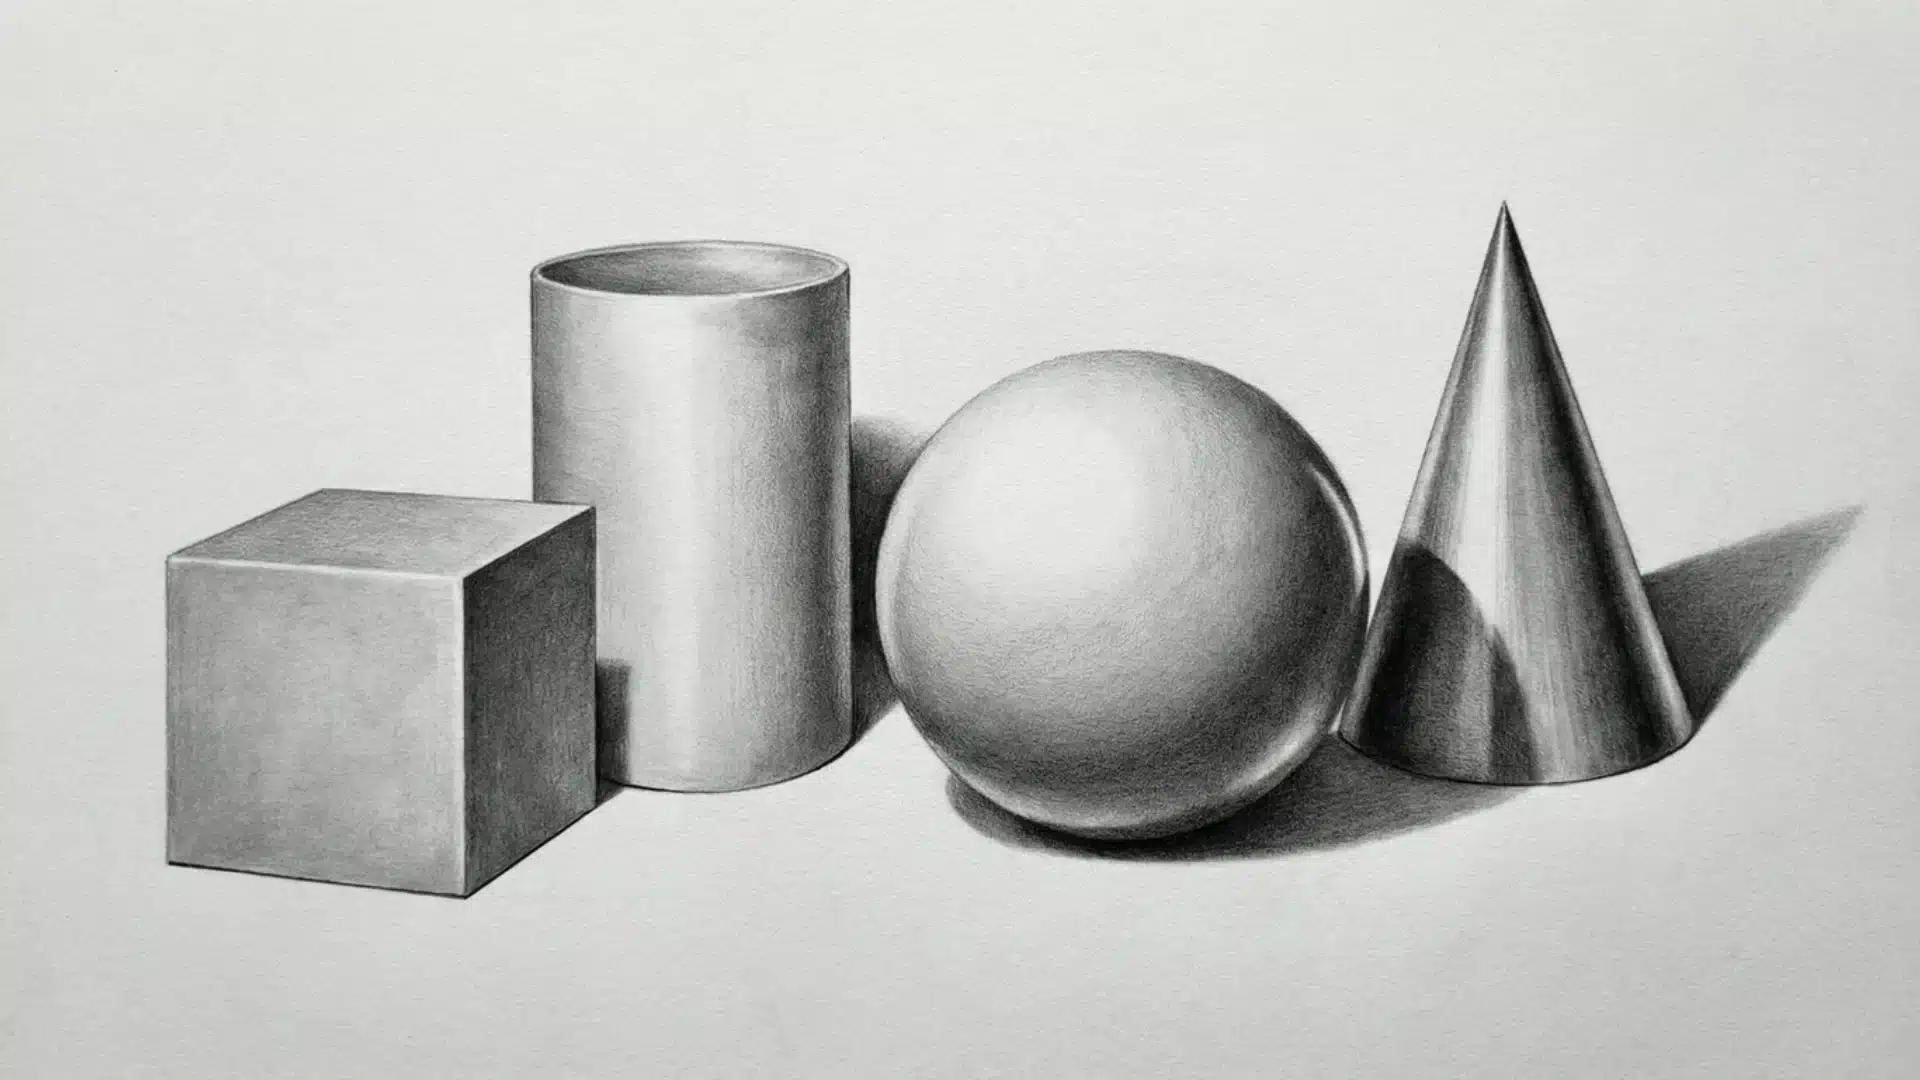
Every three-dimensional object can be reduced to a basic form. These four are the ones artists rely on the most, and once you know them, you will start seeing them everywhere.
1. Sphere
A sphere is a 3D circle with smooth, rounded shading. Artists use it to draw heads, fruits, and planets. It is one of the first forms beginners practice because it teaches light and shadow well.
2. Cube
A cube is a box-shaped object with flat, visible faces. Each plane catches light differently, making it a great way to understand how light behaves. Artists use cubes to draw buildings, furniture, and hard-edged objects.
3. Cylinder
A cylinder is a tube with rounded ends. It is one of the most useful forms in figure drawing. Arms, legs, tree trunks, and cans all start as cylinders before details are added.
4. Cone
A cone is a pointed tube that narrows toward its the. Artists use it to draw hats, mountain peaks, and tree shapes. It combines curved shading at the base with a sharp point at the top.
Practice shading each of these forms on its own before combining them. Once you get comfortable with all four, building any object from scratch becomes a lot less intimidating.
Color In Drawing

Color adds mood, clarity, and emphasis to a drawing. It can make a viewer feel calm, excited, or uneasy just by the shades you choose.
Color is created when light reflects off a surface and reaches your eye. Isaac Newton took that color spectrum and bent it into a circle, giving us the color wheel we still use today.
1. The Color Wheel
The color wheel is built in three layers. Primary colors cannot be mixed with others. Secondary colors are created by mixing two primaries.
Tertiary colors mix a primary and a secondary. This structure helps you mix the colors you want instead of guessing.
2. Hue
Hue is simply the name of a color. Red, blue, yellow, and green are all hues. When you pick a color for your drawing, you are choosing a hue.
It is the starting point of every color decision you make. Mixing hues together is how you create new colors and build a full color palette in your artwork.
3. Saturation
Saturation is how vivid or dull a color looks. Bright and bold means high saturation. Washed out means low saturation.
In most artwork, highly saturated colors work best as small accents. Too much at once can make a drawing feel overwhelming.
4. Color Value
Color value means how light or dark a color is. Yellow sits near the light end of the scale, while purple sits near the dark end.
Value and saturation are not the same thing. Learning to see both separately will strengthen your use of color.
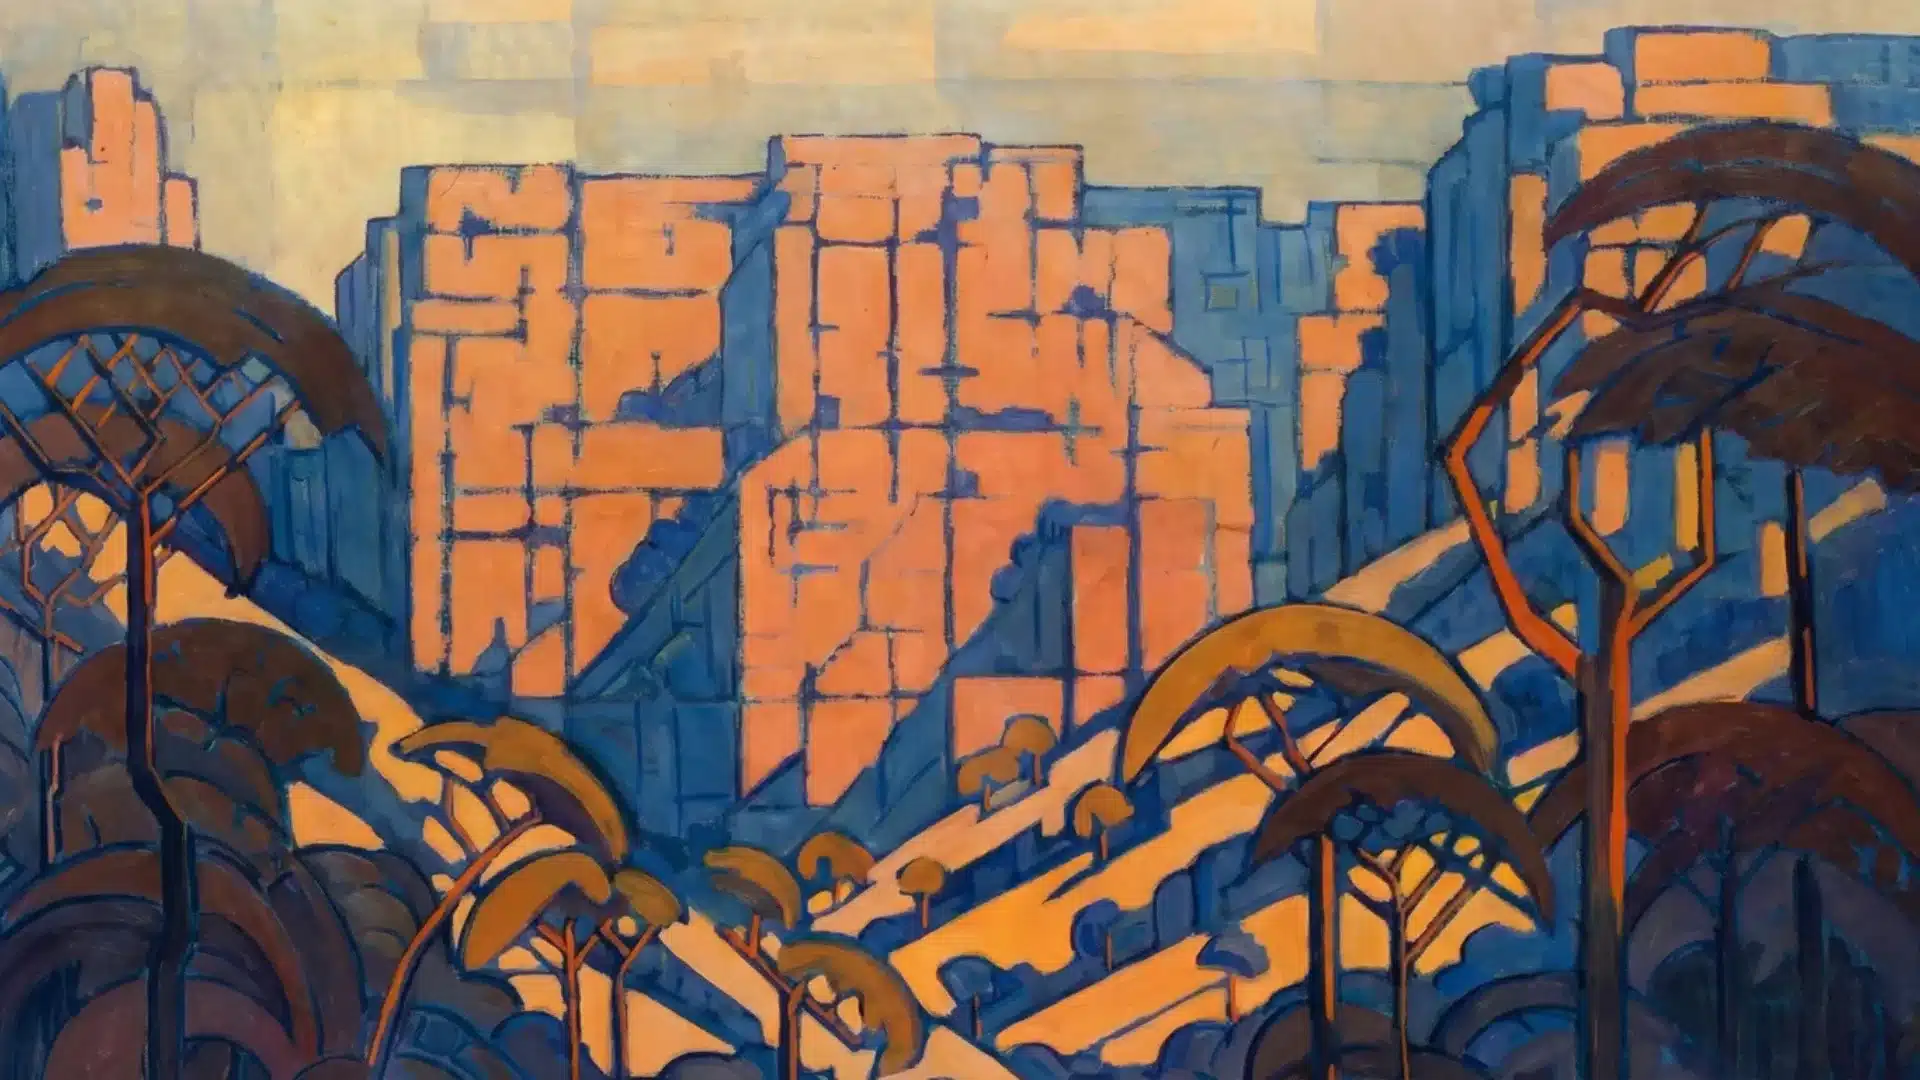
5. Color Temperature
Color temperature describes how warm or cool a color feels. Reds, oranges, and yellows are warm.
Blues, greens, and purples are cool. Warm colors tend to pop forward while cool colors sit back, adding natural depth and contrast to your artwork.
You do not need to know every color theory rule to get started. Just understanding these basics will already change the way you think about color in your drawings.
Texture In Drawing
Texture makes a drawing feel touchable. It tells the viewer what a surface would feel like in real life. Good texture adds realism and richness without making a drawing look overdone.
Knowing when to add it and when to hold back is just as important as knowing how to create it.
1. Mark-Making
Mark-making uses small, repeated strokes to suggest how a surface feels. Short, soft strokes can show fur. Rough, jagged marks can show stone.
The type of mark you make tells the viewer what they are looking at.
2. Light And Value
Every textured surface reflects light in its own way. Think of the difference between a chrome ball and a concrete ball.
One is sharp and shiny, the other is dull and rough. Artists use careful observation and light and dark values to recreate that difference convincingly on a flat surface.
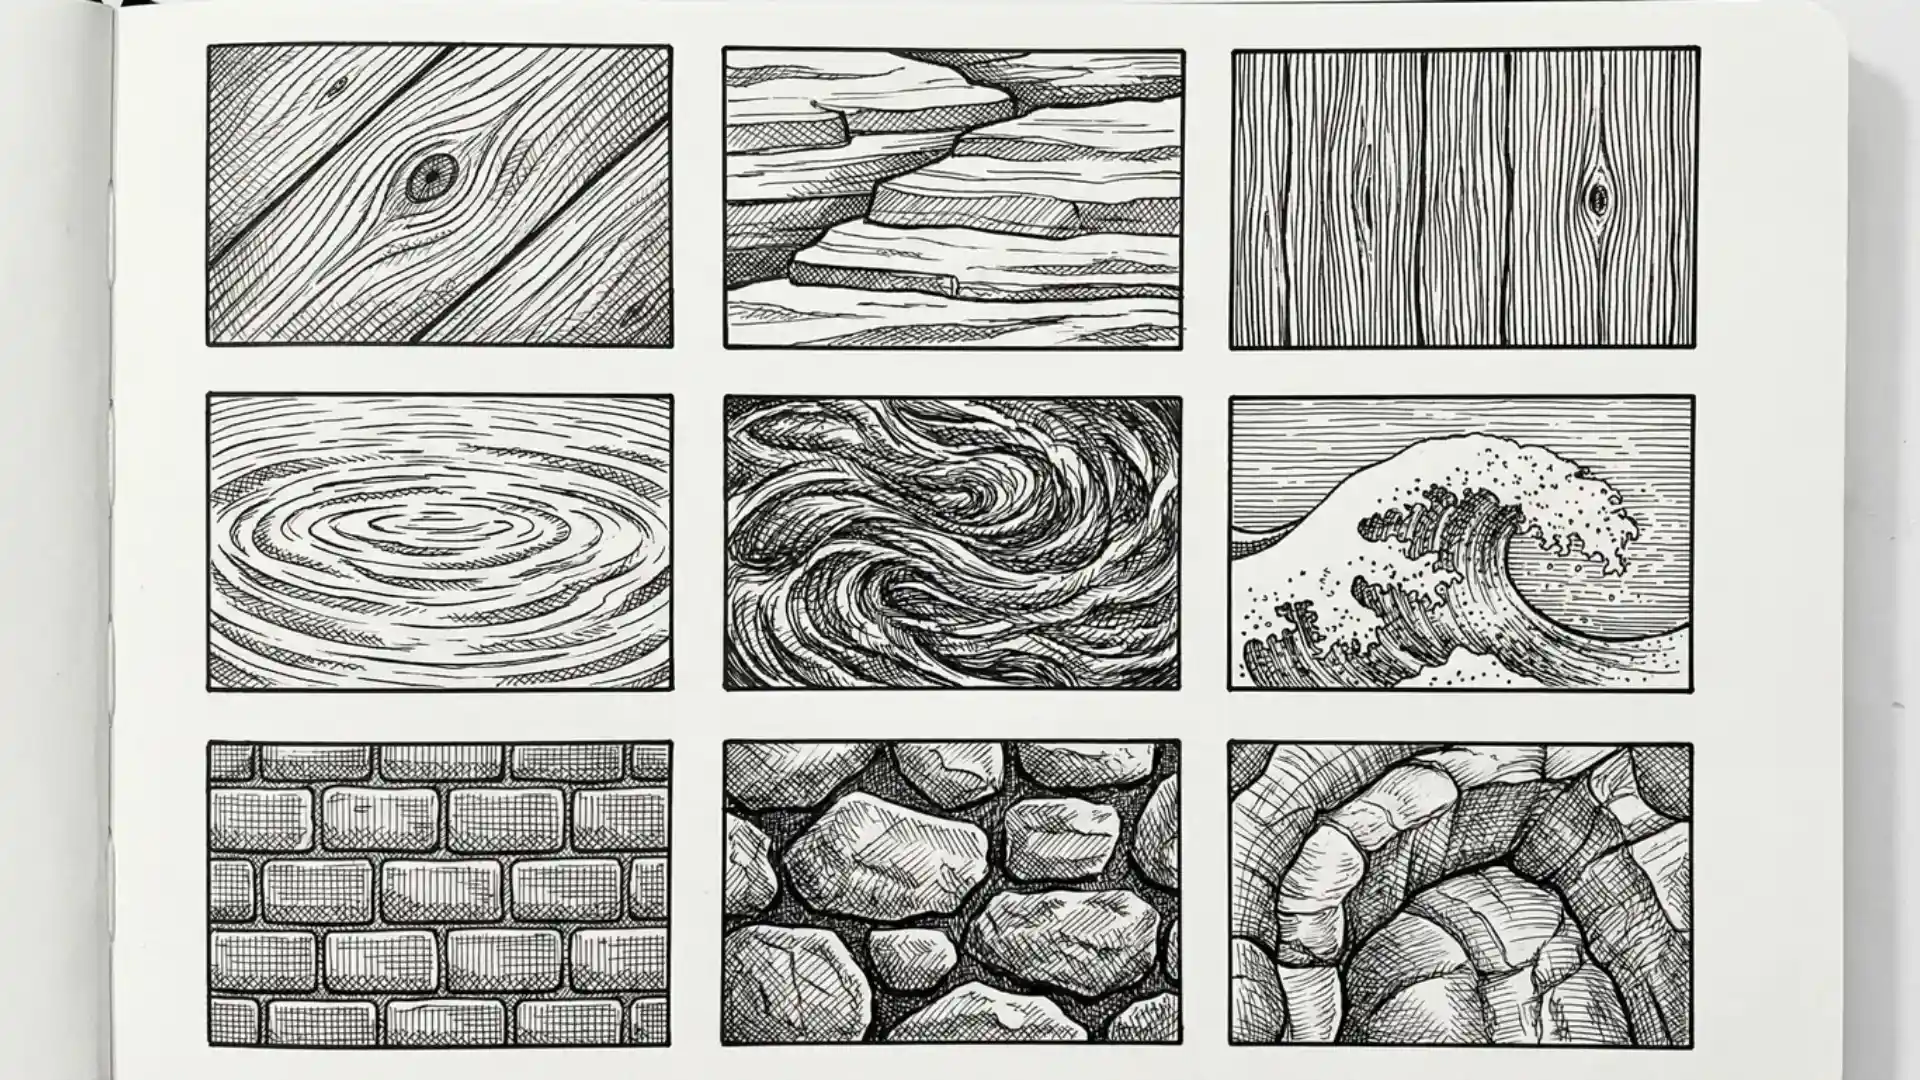
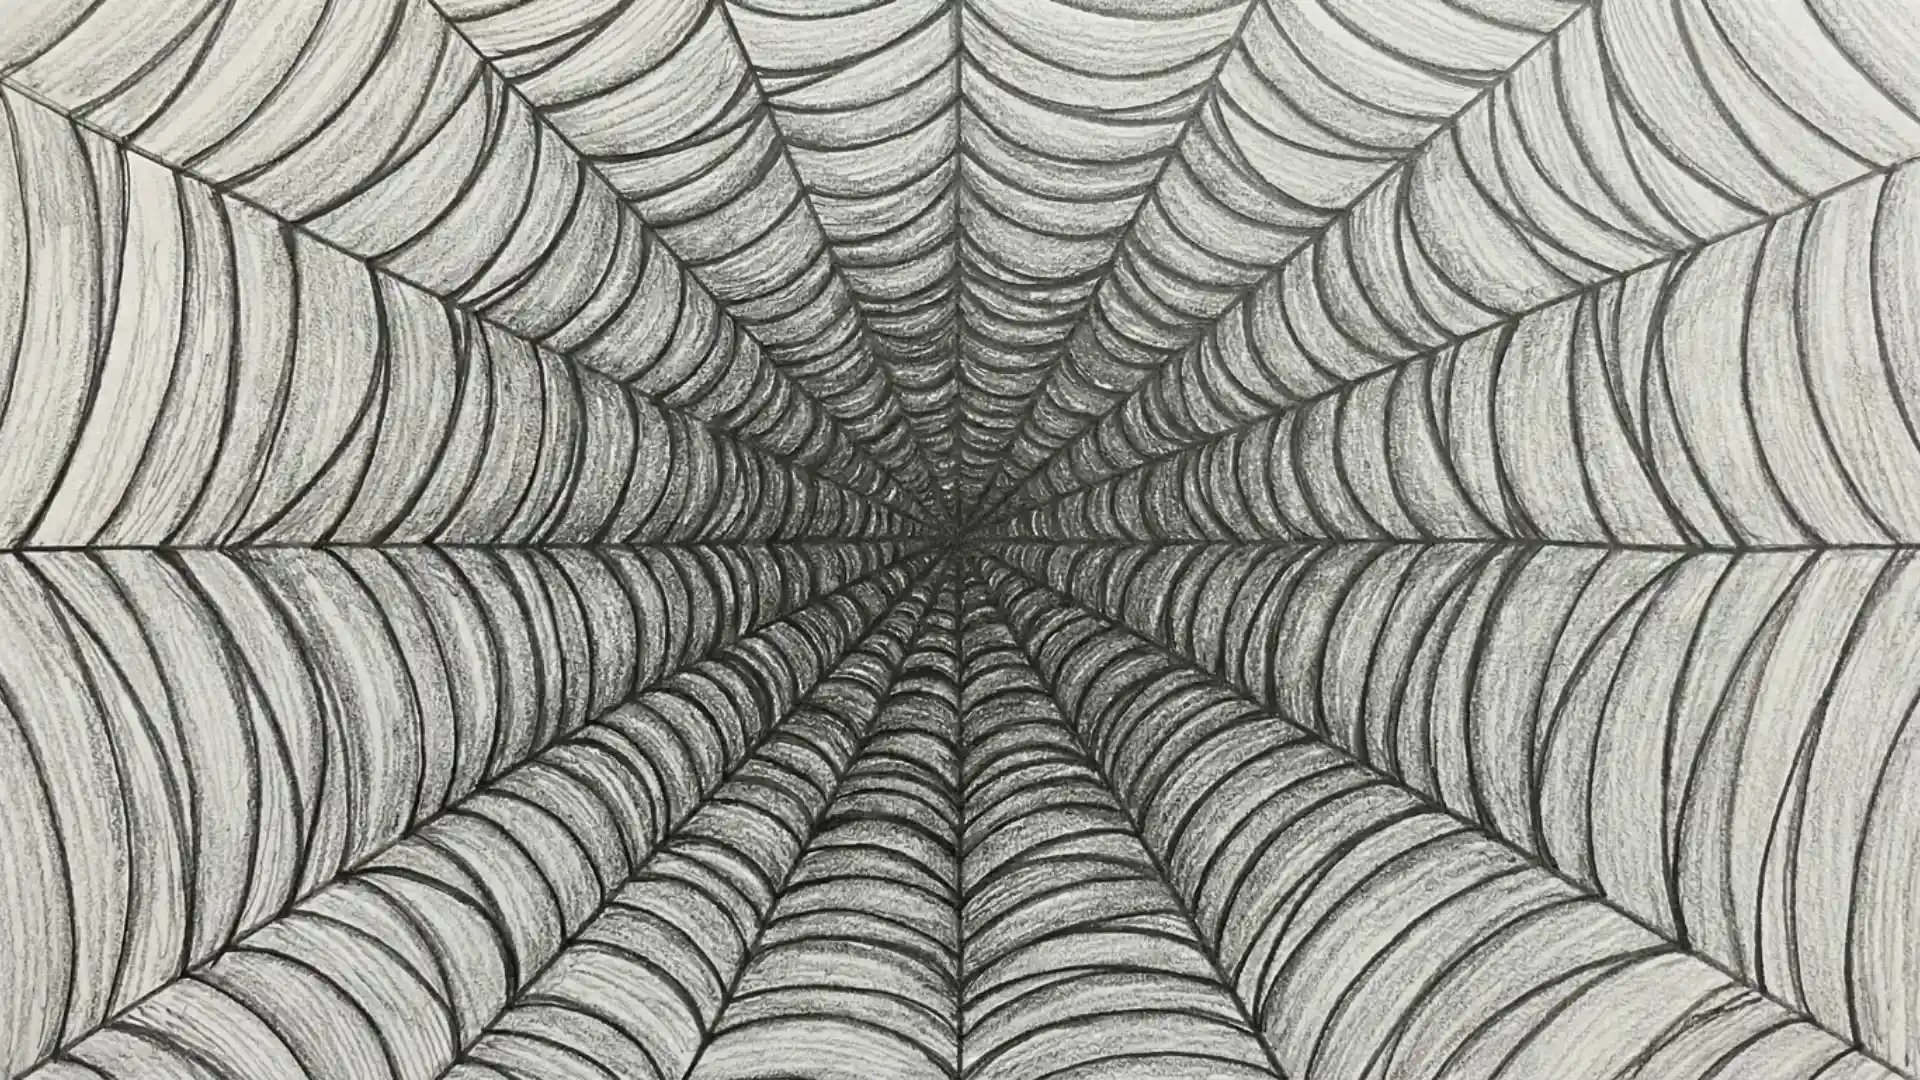
3. Pattern
A pattern uses repeated shapes or lines to create the appearance of a surface. Wood grain, fabric weaves, and fish scales are all created through pattern.
Keeping the pattern consistent makes the texture feel believable and natural. Repeating shapes in a structured way can also create a 2D texture effect, a technique often used in Op Art (optical art).
4. Contrast
Contrast between sharp and soft areas tells the eye where one material ends and another begins. A hard edge feels like metal or glass.
A soft edge feels like skin or fabric. Using both together makes textures feel distinct and realistic.
5. Edge Control
Edge control is about choosing where lines are sharp and where they fade. Hard edges feel crisp and defined. Soft edges feel smooth and gradual.
Controlling your edges is one of the easiest ways to show different textures without overdoing the detail.
6. 3D Texture On A Flat Surface
It is also possible to create a real, raised texture on a flat surface. Adding impasto paste, sand, or thick paint to your canvas leaves a physical texture the viewer can actually see and feel.
Even the marks left by thick brushstrokes can add a layer of real texture to your work.
Texture in drawing is either real or implied. Real texture is the physical feel of the paper or material. Implied texture is how you make a surface look rough, smooth, soft, or hard using marks and lines alone.
Space In Drawing
Space is what lies between, around, and within objects in a drawing. Since a drawing is a flat surface, artists use techniques to create the illusion of depth rather than actual distance.
Positive Space Vs Negative Space
Every drawing has both positive and negative space, whether you plan them or not. Understanding the difference helps you use both with more intention.
| Type | Definition | Example |
|---|---|---|
| Positive Space | The main subject or object in the drawing | A figure, a tree, a bowl |
| Negative Space | The empty area around and between subjects | The sky around a tree, the space between fingers |
Negative space is just as important as the subject itself. Too little makes a subject feel boxed in, and too much can make it feel lost.
How Artists Create The Illusion Of Space?
Since all drawings are flat, artists rely on a few key techniques to make objects look near or far. Here is how it works in practice.
- Overlapping: When one object is drawn on top of another, the eye reads it as one object being in front of the other, suggesting space between them.
- Placement: Objects placed higher in the drawing appear further away. Objects placed lower appear closer to the viewer.
- Size: Smaller objects look further away. Larger objects look closer. This simple shift in scale can create strong depth with very little effort.
- Detail: Objects in the distance have less visible detail. Reducing detail on far-away objects makes them recede naturally into the background.
- Color and value: Distant objects tend to appear cooler and lighter. Closer objects appear warmer and darker, adding convincing depth.
- Perspective: Linear and two-point perspectives use converging lines to guide the eye into the distance and are the most common techniques for showing depth on a flat surface.
Once you start using even two or three of these together, the sense of depth in your drawings will improve right away.
Value In Drawing
Value is one of the most important elements you will learn. It is the difference between a drawing that looks flat and one that looks real.
Getting your lights and darks right makes everything else fall into place. Once you understand value, your drawings will improve faster than with anything else.
Value is the range of lightness and darkness in a drawing. It is what creates the illusion of light, depth, and volume on a flat surface. Value works in any medium, whether you use pencil, pen, or paint.
1. Value Scale
A value scale ranges from pure white to pure black, with grey tones in between. It helps you plan where your lights and darks will go before you start shading.
Most artists work with five to seven steps on their scale.
2. Contrast
Contrast is the difference between the lightest and darkest areas in a drawing. High contrast makes a drawing feel bold and dramatic.
Low contrast feels softer and more subtle. Using contrast well helps direct the viewer’s eye to the most important part.
3. Highlights
Highlights are the lightest areas in a drawing where light hits the surface directly. They make objects look shiny or three-dimensional.
Even a small, well-placed highlight can instantly make a flat shape look solid and real.
4. Midtones
Midtones sit between the highlights and shadows. They make up most of the drawing’s surface area.
Getting midtones right is what makes shading look smooth and gradual rather than patchy or abrupt.
5. Shadows
Shadows are the darkest areas where light does not reach. They anchor objects to a surface and show the direction of the light source.
Strong shadows make drawings feel grounded, dimensional, and full of depth.
These seven elements work together in every drawing you will ever make. You do not need to master all of them at once.
Start with one, practice it, and then move to the next. The more you understand these building blocks, the more control you will have over your artwork.
Elements Of Drawing In Action: Leonardo Da Vinci’s Mona Lisa
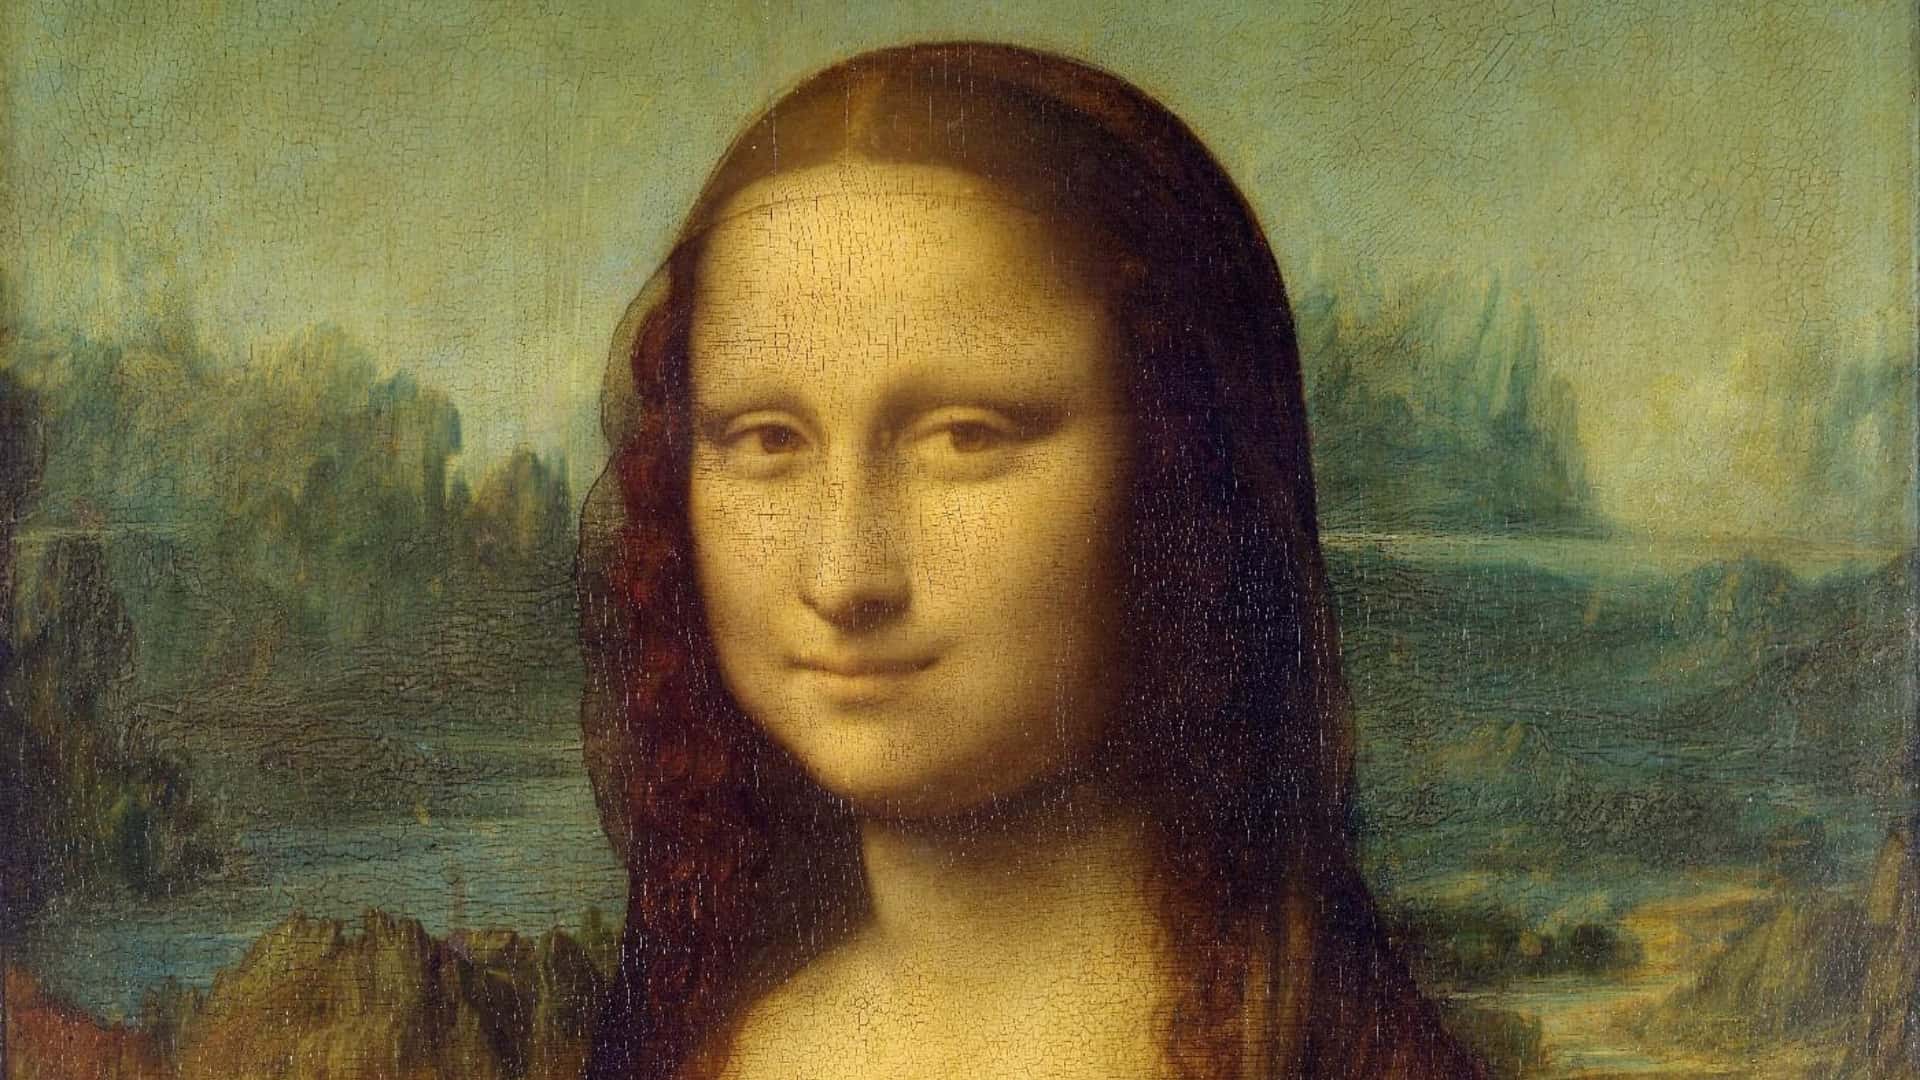
Leonardo da Vinci’s Mona Lisa, painted between 1503 and 1519, is widely considered the most famous painting in the world.
It is a masterclass in how every drawing element can work quietly and precisely in a single piece.
- Line: Da Vinci used soft, blurred edges to define the figure, a technique called sfumato, giving the painting its famously smooth and lifelike quality.
- Shape and form: Rounded, organic shapes build the figure into a convincing three-dimensional form with natural weight and presence.
- Value: Light falls across the forehead and hands, while deep shadows define the eyes and corners of the mouth, bringing the face to life.
- Color: Warm, muted browns and golden skin tones contrast gently with the cooler, hazy landscape behind, creating subtle depth.
- Texture: Skin looks smooth and soft while fabric shows gentle folds, achieved through fine, layered brushwork rather than visible strokes.
- Space: The figure sits close in the foreground while the landscape behind grows smaller and hazier, using atmospheric perspective to create deep distance.
The Mona Lisa proves that the most powerful drawings are not the most complex ones. Every element is used with restraint and intention, and that is exactly what makes it last.
Interrelation Of The 7 Elements Of Art
The seven elements of art do not work alone. They build on each other. Lines create outlines that make shapes easy to read. When shaded correctly, shapes begin to look three-dimensional and take on form.
Value, which is the range from light to dark, is what makes those forms look real. It also creates depth in space, since lighter or softer backgrounds push objects further back.
Texture only looks convincing once value and shading are in place. And while color adds mood and style, value is still the stronger foundation underneath it all.
Principles Of Art: How To Put The Elements Together
If the elements of art are your tools, the principles are the rules for how to use them. They help you arrange what you draw, so it looks clear, balanced, and pleasing to the eye.
- Balance and proportion: Balance keeps a drawing feeling even and stable. Proportion controls the relationships between sizes, so everything looks believable next to each other.
- Contrast and emphasis: Contrast uses differences, such as light vs. dark, to add interest. Emphasis makes one area stand out as the clear main focus.
- Movement and rhythm: Movement guides the eye around a drawing. Rhythm supports it by repeating shapes or lines to create a natural, steady flow.
- Unity and variety: Unity makes all parts feel like they belong together. Variety adds just enough change in shapes or tones to keep things visually interesting.
- Pattern and scale: Pattern builds visual flow through repeated elements. Scale controls how large or small things appear, adding depth and structure to the drawing.
Once you start seeing these principles in drawings you admire, you will naturally start applying them in your own work without even thinking about it.
Practical Exercises And Applications
The best way to understand the elements is to practice them one at a time. Start with a line by drawing the same object twice, once with thin lines and once with thick ones.
Then pick three objects and simplify each into basic shapes. From there, draw a sphere or cube and shade it to practice form. Try a simple sketch using only two or three colors.
Fill four small boxes with different textures, such as wood, metal, fabric, and fur. Draw two objects where one overlaps the other to practice space.
Finally, create a five-step scale going from light to dark to build your understanding of value.
Why Is It Important To Know About The Elements Of Art?
Understanding the elements of art is not just for professional artists. It is for anyone who wants to get better and stop guessing.
When something looks off in your drawing, the elements tell you exactly what to fix. They help you arrange your work so it feels clear and balanced.
They also apply to every style, whether you draw cartoons, realistic portraits, or abstract pieces. Most importantly, they build your confidence.
When you know the basics, you stop second-guessing every mark you make and start drawing with purpose. That is what makes the elements so worth learning.
Common Beginner Mistakes With The Elements Of Art
Every artist makes mistakes when starting out. The good news is that most of them come down to the same few habits, and once you spot them, they are easy to fix.
- Outlining everything: relying on outlines for every edge makes your drawing look flat. Value and shading are what actually give objects a three-dimensional look.
- Adding texture everywhere: covering every inch of a drawing with texture leaves no breathing room. Rest areas are just as important as detailed ones.
- Ignoring negative space: the empty space around your subject matters just as much as the subject itself. Ignoring it leads to proportion and placement issues.
- Choosing colors too early: picking colors before getting your values right is one of the most common traps. Solid values always come before color decisions.
- Treating all lines the same: using one line weight throughout makes drawings look flat. Varying your lines adds depth, movement, and visual interest.
Once you start noticing these habits in your own work, fixing them becomes much easier. Small adjustments to how you use the elements can make a big difference in how your drawings turn out.
Conclusion
And that is a wrap on the 7 elements of art drawing. We covered a lot, but here is what I want you to take away from it all.
Every drawing you admire, every piece of art that stops you in your tracks, was built using these same building blocks. Line, shape, form, color, texture, space, and value. That is it.
You do not need to master all seven overnight. Pick one element, sit with it, practice it, and then move to the next. Over time, you will start combining them naturally without even thinking about it.
That is when things really start to click. So tell me, which element are you going to focus on first? Drop it in the comments below. I would love to know.