
No products in the cart.
Organize
Bound To Be Found – How To Organize Papers
This post is written to help those that keep important family documents in a drawer, a box, or even worse in a big pile on a desk or somewhere in a dark corner. For those that spend hours looking for an important document which in their minds a minute ago was right at their eyesight.

If you are not one of those people don’t go away just yet, as you may find something helpful to improve your current arrangement.
I will show you a system that greatly works for me, so I don’t have to waste my time searching through piles of papers to find the one. Oh! And there is a bonus to it too. Its decorative aspect makes it look great on any shelf.
I will show you a system that greatly works for me, so I don’t have to waste my time searching through piles of papers to find the one. Oh! And there is a bonus to it too. Its decorative aspect makes it look great on any shelf.
get supplies
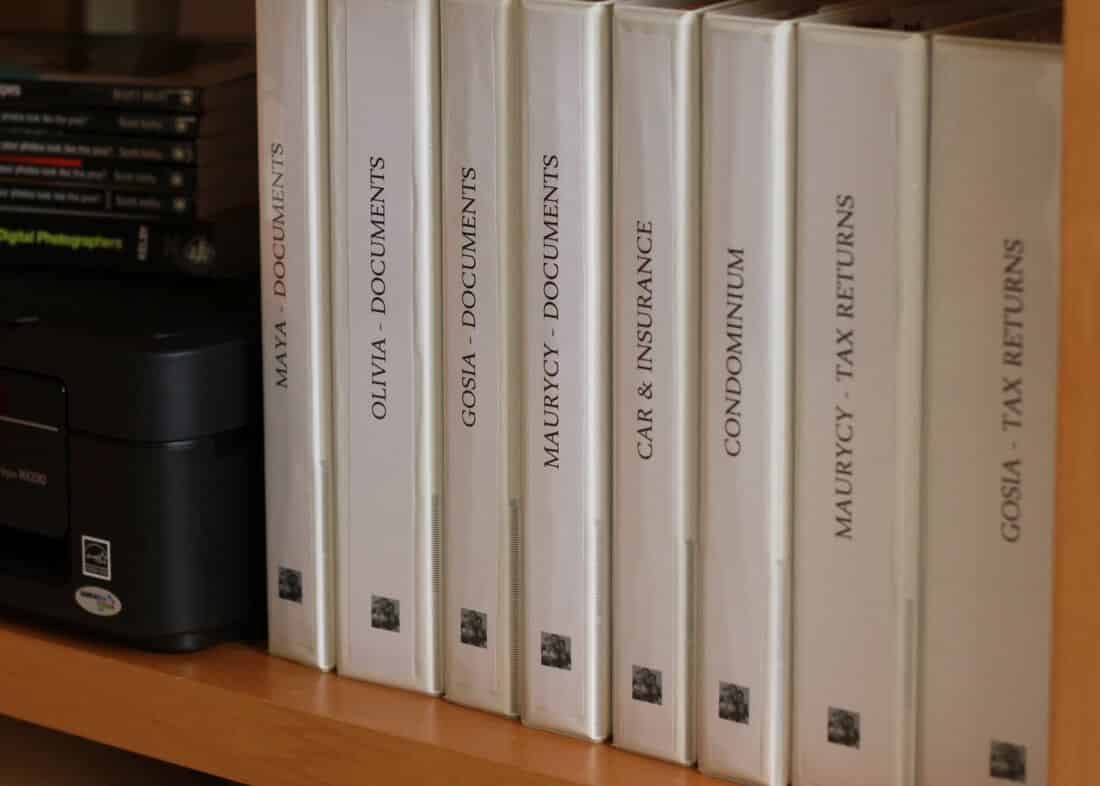
- Binders with clear overlay on the front, back, and spine are my favorites as those are easy to customize with printed signs. This feature helps to categorize binders and give them a nice finished look. I have picked white (as it works with my decor) but you can choose any other color you like. The size? Most of mine are 1.5” and 2” wide and I have one that is 3” – it all depends on how many documents you will put in one category.
- Sheet protectors to protect those documents that should not have punch holes in them.
choose categories
Each binder should represent one category. There can be as many categories as you can imagine – but at first, I would focus on the main ones that come with lots of papers. This way you will get rid of most of the unwanted mess. And then you can focus on smaller groups if you decide you need to.
These are my categories so you can see what exactly I have in mind:
1. I have one for each member of the family. I titled these binders – the first name of the person plus the word “documents”, for example, “Olivia-documents”. In those binders, I have all documents that relate to each person like birth certificates, school diplomas, work documents, school report cards, and medical records. In Olivia’s binder, I also have a few of my favorite drawings that she did over the years.
When kids are ready to move out each of them will get their binder in hand, so they never have to return. LOL.
When kids are ready to move out each of them will get their binder in hand, so they never have to return. LOL.
2. “Taxes” binders – thank goodness kids don’t have to pay taxes yet. Even though these are just for the two of us they are the biggest of all. With a general rule that we have to keep all receipts for at least 7 years, there is a lot to store.
3. “Condominium”– here I put all documents that relate to our home: mortgage paper (unfortunately we still have a mortgage on our home), insurance paper, but also all condominium rules, policies, assessments, etc. Who knows when that may become handy?
4. ”Car & insurance” binder – Both categories were so small that I decided to share this binder for the two of them. We put in documents related to the car like lease documents, maintenance bills, etc., and life insurance documents.
5. There is one more binder that I am working on. Ok, let’s be honest, I didn’t even start it yet, but it will be our emergency binder. I’m planning to put all “just in case” information in there. All life insurance policies, addresses, and phone #s of emergency relatives, etc.
So now that you have an idea of how to choose binder categories – you should think of what yours can be. Don’t worry, it’s not that crucial to have it all figured out right away, but it would help to have at least a few that you can start with. I bet you, they will come to you as you go through your papers. Or simply you can copy mine for now and change them later.
sort things out
It would be great if you can designate 15 – 20 minutes a day for this project. And if you do, I promise this will go nice and smooth and you will not even notice when you are all done. Don’t attempt doing it all at once as you may get overwhelmed and give up, and we all want you to succeed.
Pick up one paper from the pile at a time, and decide if you really need it. Maybe it is an old bill or maybe an expired warranty. If that is the case then put it to the toss pile. I would recommend shredding or burning it afterward, as those documents may contain personal information.
Each paper that you pick up and you decide is a keeper has to be sorted into appropriate categories. Create small piles for each category and place their appropriate documents. At the end of daily time – simply file those small piles into the corresponding binder. Repeat that action each day until all mountains of unsorted documents disappear.
Don’t worry about sorting all documents alphabetically, or by the importance of it. It doesn’t matter at this point. It will only slow you down or totally sabotage your project. Remember if you decide you need to, you can always do that later on. Believe me, I like to have my ducks in a row most of the time but even my binders are not chronologically organized. make it look all pretty
I like clean and simple decorations with limited colors (as you can see I used black signs on white paper in white binders. But if you want you can go crazy with colors and writing styles. Use whatever will suit your decor and taste.
This is it! No more unwanted piles. Enjoy your organized papers.
This is it! No more unwanted piles. Enjoy your organized papers.
Oh! I almost forgot about the maintenance.
Just follow the rule “touch it only once” – whenever you get a new document (for example you received it in the mail) – open it, read it, and put it right away into the proper binder. It’s that easy.
Good luck and don’t forget to let me know if this solution worked for you.

Great job at explaining step by step on how to clean my paper mess. I already got the binders. Now off to sorting.
I am so glad that you liked it and you are willing to try it out.
Good luck with sorting 🙂
wow you are amazing you thought of everything even help to print the labels- love it I can’t wait to organize my documents – more tips please!
Kate.Thank you for your nice words. I am very happy that you found those tips to be helpful.